What do I blog about?

Showing posts with label Tutorials. Show all posts

Sunday, January 27, 2013

Mommy Daughter Maxi Skirts


 I made myself a red, gathered maxi skirt this past week and had enough fabric to make a little maxi skirt for my daughter. She LOVED it! I had her try it on for size yesterday and I could hardly get her to take it off so I could finish stitching it up! My skirt is essentially a large rectangle sewed together at the sides, gathered at the top and attached to a waistband. The stretchy knit fabric makes zippers and hems unnecessary. Hers was a much smaller rectangle, sewn halfway down the side (I chose to leave the bottom of the side seam open creating a slit that makes running, climbing and all sorts of toddler play more possible), and a rolled skirt top into a casing in which I threaded 1 inch elastic. We wore our matching outfits to church today. I'm glad she still thinks I'm cool enough to dress like!

 Getting her to stand still and look at the camera was a battle this morning...
 She's just too silly and energetic for Sunday morning portraits!


Friday, November 30, 2012

Reusable nursing pads (DIY)

If there are two things I absolutely love using this time around as a new mommy, they're homemade nursing pads and burp cloths. The nursing pads are so much more comfortable than the disposable kind, not to mention cheaper and more cute too. I just used extra receiving blankets that I had  and some baby flannel fabric scraps left over from past projects to create the layers. I made thinner ones for day use and thicker ones for night time. The important thing is to make one side of white fleece. White so the pattern doesn't show through your shirt and fleece because it is water resistant. I used [this] tutorial to get me started.

The burp clothes are easy enough and I'm sure there are tons of tutorials out there if you are interested. I made some from cloth diapers and old receiving blankets and fabric scraps, and was gifted some as well. They're functional and they're fun to look at!

Tuesday, November 6, 2012

What to do to prepare for the new baby

Due to complications around 30 weeks of this pregnancy, I have spent several weeks thinking each week was my last week being pregnant... During those times, I have filled my days with "last minute" preparations for baby's arrival and today when I stopped and thought about it all, I realized: Holy cow! I'm really ready now. From freezer meals, to including our toddler, warding off germs, and planning ahead for some personal R&R, I think I'm all set. More than likely, I have yet another week (though this one really is going to be my last week pregnant... for real!) so I'd totally love suggestions as to what ought to be done in the upcoming days that I haven't already thought of!
Chaotically Pictured Above (and explained below):
1. Outfit bags
2. Toddler activity box
3. Toddler care instructions
4. Hospital Bags for Toddler and Mom (mine isn't pictured)
5. Clean hands sign
6. Mama's R&R eye mask and bath soak
7. Freezer meals
I should have included the following in the picture since they're done too:
1. Clean sheets
2. Birthday cards, written and addressed for the next two months
3. Christmas gifts completed and wrapped
4. Stocked pantry

What the heck am I talking about?! 

1. Outfit bags. 
I originally saw this idea on pinterst as a technique to make vacationing with children easier, but I thought it'd be perfect for this as well! It's as simple as bagging seven individual outfits with a diaper in each bag for your child. I also bagged the two pair of pajamas that we rotate through. This is going to be a life savor while I'm either in the hospital, or tending to the new baby once I am home. Who ever is looking after our toddler will only have to grab a bag to help her get ready in the morning! No need to rummage through messy drawers guessing as to what fits and what our preference is... Also, my daughter is entering that age of independence and already likes to pick out her own clothes- or at least dispute the ones I choose... This way, she can pick a bag, but she'll still have on a matching, cute outfit! This is important because our camera is going to be used a lot those first few days. Win/ win.

2. Toddler activity box. 
Our daughter is perhaps just like every other toddler out there. Demanding, easily bored, high energy, and curious. I have a hard enough time entertaining her now (and failure on my part leads to tantrums on her part) I know it's going to be even more difficult while I am nursing or rocking her baby brother. So, I put together a box of crafty, fun activities for her that I, or her daddy, or a babysitter or a grandparent can use to keep her occupied. It includes crayons and coloring books, water color paints and paint pad, props for interactive nursery rhymes and songs, play dough, cookie decorating supplies (dough is pre-made and in the freezer,) and supplies for mess free finger painting (seriously! Check it out.)

3. Toddler care instructions.
This is pretty simple; just a binder with a few pages in it that a babysitter might find helpful. It outlines our daily routine, what we do before nap and bed time. I also included some tips for communicating (remember we teach her sign language, which is great- but lots of times she won't vocalize her words, which is not so great if you don't speak sign language. Same with some words in Spanish. If you ask her to show you her hand she simple won't do it, but she'll gladly wave around her mano.) Some songs she knows, and important phone numbers: ours, family, doctors and friends.

4. Hospital bags. 
Mine has been packed for quite a while now. My three most important things to include in it were the camera, my birth plan with specific instructions as to my preference concerning fragrance free lotions, no baby eye drops, my decision on vaccinations, etc, and chocolate. I also found this hospital bag check list to be incredible, it's written by a nurse who worked on the labor and delivery floor. For the toddler hospital bag, the super cute, pink "big sister" bag sent to me by my awesome friend from A Pocket Full of Elephants has quiet activities in it to keep her occupied while visiting me and baby in the hospital. Crayons and coloring books, stickers, books and hot wheel cars.

5. Clean Hands Sign. 
When our triplet nieces finally were able to come home from the hospital I remember this cute little phrase hovering around where they lay. "Please wash your hands before touching ours." So, I made a similar print out and framed it. Right now it's sitting on a table in our entry way with a bottle of hand sanitizer. Any attempt to keep our son, and our whole family for that matter, healthy is going to be taken here! Especially since he's going to be born in the midst of flu and RSV season! Yikes.

6. Mama's R&R eye mask and bath soak.
I love my homemade, lavender scented eye mask and I really hope to be able to snag a nap every now and then using it after we bring baby home. I blogged about making it [here.] Fellow blogger and good friend Bethany of Happy Homemaker Me posted a natural healing kit for new mothers and in it was included a lavender oatmeal epsom salt bath soak. Ahhh. It's wonderful!

7. Freezer Meals.
Man, did I resist these! Oh, how they seemed like to much work, and organization, and time... But, my same friend who sent the Big Sister Bag above kept talking about them and how she has been making hers in preparation for her twins, and I finally gave in to following her lead. I'm sure glad that I did too!!! Of course, my cousin helped assemble some while she was here and that was awesome of her. I've since twinked the recipes to our liking and made more...

Fajita Chicken Dinner (recipe makes two meals)
Adapted from Ring Around the Rosies
6 Chicken breasts
3 8oz cans diced tomatoes with chiles
1 large onion, sliced
2 green bell peppers, sliced
2 red bell peppers, sliced
2 garlic cloves, minced
3 teaspoons cumin
3 teaspoons chili powder

Split ingredients equally between two large zip lock bags. Seal, mix, lay flat and freeze. To prepare, remove one bag from the freezer, let thaw almost completely and cook in the crock pot on low 4 to 6 hours. Serve with corn tortillas and sour cream.

Teriyaki Chicken Dinner (recipe makes two meals)
Adapted from Ring Around the Rosies
6 Chicken breasts, halved
6 Large carrots, peeled and halved
1/2 red onion, cut into large chunks
1 large can of pineapple, undrained
1 large can of pineapple, drained
2 garlic cloves, whole
1 cup teriyaki sauce
1 red bell pepper, sliced
1 can water chestnuts, drained

Split ingredients equally between two large zip lock bags. Seal, mix, lay flat and freeze. To prepare, remove one bag from the freezer. Let thaw almost completely and cook in the crock pot on low 4 to 6 hours, adding an additional 1/2 cup of teriyaki sauce is optional. Remove garlic before serving. Serve over rice.

Gluten Free Teriyaki Sauce
Combine and heat:
1/2 cups gluten free, low sodium, soy sauce
2 cups water
1 teaspoon ginger powder
1/2 teaspoon garlic powder
1/2 cups brown sugar
3 tablespoons honey

Mix and add to above once hot
1/2 cup cold water
4 tablespoon cornstarch

Remove from heat once it has reached desired thickness.

Spinach Lasagna Rolls
26 oz spaghetti sauce
12 lasagna noodles, prepared, rinsed cool and patted dry. Set aside.
Combine the following:
2 eggs, beaten
2 1/2 cups ricotta cheese
2 1/2 cups mozzarella cheese, shredded
1/2 cups Parmesan cheese, shredded
1/2 package fresh baby spinach

Pour 1/3 of spaghetti sauce into the bottom of a greased baking pan. Spoon mixture onto lasagna noodles, roll up the pasta and place in the baking pan. Smother with remaining sauce. Cover and freeze. To prepare, thaw and bake at 350 degrees for about a half hour or until hot through.

Buffalo Chicken Bites
Bird Nest Pie (Baked Spaghetti) 
Enchiladas with gluten free homemade cream of chicken soup

Thursday, November 1, 2012

Little Chef Attire

This was such a fun project! Not only did it not take very long (only two nap times; one for the apron and one for the hat) but I think it turned out darling! Now, my little girl needs a toy kitchen to go along with it! She wore hers out trick or treating for Halloween as we went as a family of chefs.
For the chef hat, I followed a tutorial posted at Curly Pops. I wish I could have used snaps like she did, but I have no clue how to go about sewing them in. Instead, I used Velcro and it works just fine.

Simplicity 2319


The apron pattern is Simplicity 2319. Loved it! Few pieces, easy to customize, easy to understand... The pattern makers were even so brilliant as to make the arm edges finished with a casing that the neck and waist ties feed through so that everything about the apron is size adjustable! Of course, I didn't realize this until after I finished the arm edges my way... But next time, I will be sure to follow their directions more closely because I think it's a fantastic idea! Instead of two small pockets, I attached one larger pocket in the center of the apron. Better for my toddler to fill with little treasures. I added the little waistband and am still absolutely in love with the little cupcake fabric I found at Joanns. It's such a nice feeling when a project actually turns out as well as I'd hoped!

Wednesday, October 24, 2012

Circle Skirt Tutorial (maternity friendly)

A while back, I made my very first circle skirt. I found an excellent tutorial at Dana Made It.com and I in no way want to steal any of her credit; she is, after all, the math genius who explained the method for creating a proper fitting circle skirt.She did a great job and I really appreciated having her tutorial. I am however, posting my own tutorial here for three reasons:

1. Dana walks you through creating a circle skirt pattern first. I'm a nap time sewer which means I'm short on time and would like to skip any steps that aren't crucial. No pattern needed here!
2. Danas measurements are for a skirt that requires no side seam. Great for little girls, or smaller women who also purchased 60" fabric. By adding one simple seam, my circle skirt fits more sizes and with less fabric too!
3. Instead of elastic, my instructions are for a waistband made from a 4 way stretch fabric. This is less rigid than thick elastic and so I find it to be more comfortable. While it works for anyone, it is really wonderful for my pregnant belly. I like anything with a nylon blend, try looking near the dance/ swim section. Yes, this type of fabric gets pricey but you don't need very much at all and I can often pair it with a coupon! We're actually going to be creating something similar to the tutorial I have posted for a DIY belly band so if you like a stretchy jersey knit- that works too!

Ok, let's get started!
What you will need:
*2 yards of 45 inch fabric. (I bought mine on sale for 2.50/ yard at Joanns! Score!)
1/4 to a 1/2 yard of 4 Way Stretch Fabric (I like anything with a nylon blend.)
Scissors and other typical sewing necessities.

 * I am of average size and 5'7'' tall. Two yards of 45 inch fabric was enough for me to make this circle skirt about 21 inches long. If you think you will need it, you may want to consider buying a quarter to a half a yard more of fabric to achieve a larger and/ or longer skirt.

Begin by taking your measurements. Measure around your waist, or for those of us with a baby on board- measure under your belly. Then, add 2" to that number. This will be helpful when it comes time for the seam allowance and also for a slight gather to help the skirt pull on over your hips once finished. (Myself: 38 and 3/4 inches + 2 inches = 40.75")

Divide this number by 6.28 (Myself: 40.75 / 6.28 = 6.48  *I rounded to 6.5)

Multiply your new number by 2. (Myself: 6.5 x 2 = 13") This final number is what we will use to create our waist line!

Fold your fabric in half, right sides together, and draw a collection of dots the distance away from the corner according to your final number. (Myself: 13") Sketch to connect the dots. This will create a nice curve, and makes a lot more sense once you look at these pictures:
My sketch is a little easier to see than the dots on my busy fabric!
Now, measure the distance from that curve to the end of your fabric on the shortest side. This will be your skirt length. Obviously, if you had purchased more than 2 yards of fabric you can make your skirt longer. I, however, found that I had 22 inches from the waistline I just created to the end of my fabric. Now is not the time to stress about whether or not you're going to like your final skirt length. Just take the measurement (mine was 22") and go with it.You can always hem it to be shorter later.
Make another series of dots to create your skirt length and once again, sketch to connect those dots. See pictures:
Cut out your skirt along those two lines.
One side of your skirt is on the fold. Pin the other side together and sew your side seam together with a 1/2 inch seam.

Set your skirt aside and focus on the waistband. Measure around your waist again and add 1/2 inch for a seam allowance. Decide how thick you will want your waistband, double that because it will be folded in half and add an inch for a seam allowance. (Myself: I want my waistband to be 5 inches thick, double to get 10" and add an inch for a total of 11 inches.) Cut yourself a rectangle with those measurements out of your stretchy fabric.
*Note: I should have written "Waist Measurement + 1/2 inch for seam allowance" on the vertical line
Sew up the side seam and then fold the tube like band in half.

Feed the top of your skirt through your waistband and sew raw edges together using a zig zag stitch. This is very important because it allows the thread to stretch with stretching of the waistband.

All you have to do now is hem the bottom of your skirt. Make your hem as thick or narrow as you want depending on how short or long you want your skirt.


Tuesday, October 16, 2012

Handsome Appliqued Onesies

I'm nearing the end of my pregnancy now, and preparations for a baby boy are in full swing! A while back I made a few handsome appliqued onesies... cannot wait until he is here and wearing these!  I absolutely love it when little boys dress like men. Maybe this is because I was lucky enough to have had such wonderful male role models in my life. I couldn't have asked for a better father, and my husband is the most genuine, dependable person I know. I am certainly going to be encouraging my son to emulate his daddy, and he can start at birth by wearing this handsome apparel.


I LOVE how these turned out- but I cannot believe how long something so tiny took me to make! Actually, I think the tiny factor was part of the problem. Little openings in little onesies are difficult to feed through the sewing machine. A *trick* I discovered along the way is to iron the applique onto interfacing before attaching it to the onesie. This not only keeps the applique fabric from sliding out of place while you maneuver the onesie through the machine, but it eliminates the need to fold under seams for a nice finished edge that won't unravel.

{Tutorial} Remember, if you need to- you can click on a photo to see it enlarged.


To make this handsome get up:
1. Create your template
2. Cut your fabric appliques
3. Iron appliques onto interfacing
4. Sew onto pre washed baby onesies.

The tie applique is very simple to make. Here is a picture of the pattern I created and used. The tie is 7" inches in length and I sewed them onto Gerber sizes 6 - 9 months. As Gerber runs small, I think a 7" tie would be perfect for other brands 3 - 6 months. Ties certainly don't have to be perfect; different widths and lengths can add character and charm!
I cut the top of the tie away from the bottom of the tie and angled the top piece on the fabric when I was cutting it out to resemble more closely how a real tie looks when worn by handsome grown up men. (Just an FYI: This awesome material was once my grandpas shirt, but then he handed it down to my husband who wore it a couple of times before I decided it needed to become a baby tie!)
The bow tie and suspenders I just kinda eye balled, but I created this sweet little vest like so:
I began by laying the onesie- folded in half- onto a piece of paper and marking where the edge of the onesie was, where the fold was, and where the shoulder seam was.
I drew a tab out a quarter of an inch from the fold line so that the vest would over lap at the center and then I just eye balled the rest of the lines in.
Here is the template I ended up with:
Once again, I sewed this vest onto a Gerber size 6 to 9 months.


Tuesday, September 25, 2012

Breezy Maxi Skirt with Side Stripe

From bedsheets to clothing...

Remember the long skirt I wore in my maternity photo shoot? Here's the scoop and a lil' tutorial too.

My absolute favorite thing to purchase from a thrift store is a bed sheet. With a good washing it is more than ready to use in a sewing project, and I always buy the whole sheet for less than I could have found even a yard of the same material at a fabric store. This particular skirt was made out of two bedsheets, both were queen sized fitted sheets (though yes, I did have a lot of sheet left over) and I paired them with a blue blouse that I also purchased from the thrift store while I was there!

When I set out to make another outfit for myself, I envisioned something feminine; something flattering for my rounding pregnant body (and lets be honest, it isn't just my stomach that's rounding out!) A maxi skirt came to mind, but I wanted to achieve more flow and airiness than can be had with a heavier knit fabric. I am so glad that I had picked up this floral bed sheet a while back! I am so happy with the result.

All you need is two complimentary fabric pieces, or bed sheets and a length of 1" elastic. Here is how I made it (p.s. It was super easy!):

Begin by taking your measurements. 
Measure around your middle where you plan on wearing your skirt. Add 20 inches to this measurement. I measured 32" + 20" = 52"
Measure how long you want your skirt to be. I had my husband help me; he measured from where I took my "waist" measurement above, all the way to the floor over my belly in the front. Add 1 inch for a hem and 2 inches for an elastic casing. I measured 47" + 1 + 2 = 50"

Cut out your fabric pieces.
Cut out a rectangle from your fabric according to your measurements. I cut mine 52" x 50"

Now, take your second fabric and cut it out in the shape of a triangle (except the top is flat doesn't meet at a point) where the top is 10 inches wide, and the bottom is 18 inches wide, and the length is the same as your skirt (50" for me.)

Get ta sewing!
Pin the triangle piece to that of your rectangle piece and sew up both seams, right sides together.

With skirt inside out, create an elastic casing at the top. This is very simple to do, if you're not sure how to do it- there are lots of simple tutorials out there. Just remember to leave an opening to feed your elastic through! Once you've made your casing, insert elastic and finish it off.

Hem the bottom of your skirt. I chose to use a narrower hem in the front of my skirt than for the rest of my skirt so that my baby bump wouldn't make my skirt appear too much shorter in the front.

Wednesday, August 29, 2012

Little Man Rag Quilt

With third trimester well under way, preparing for baby is in full swing. I went back and forth a lot in choosing a baby boy nursery theme, but finally decided on doing all things little man style in browns and blues. I wanted to start with his quilt so I could decorate the rest of his space around it.


To make this rag quilt, I hit up the local thrift store and came home with a blue bed sheet, a huge- fuzzy blue blanket, and a couple of plaid and flannel mens button up shirts. I combined this with all things brown and blue, including jean scraps, from my fabric scrap bin and set to work. In the end, this whole quilt cost me 10 dollars and 3 nap times. That's a great deal! Just the fuzzy backing alone would have cost near 30 dollars if purchased at a fabric store!
My finished quilt measures slightly larger than 36" by 48".

I cut 48 squares 7 1/2" by 7 1/2" and sewed them together, wrong sides together, with a 3/4" seam.

I decided to add a boarder and cut it 4" wide out of the bed sheet.  I attached it both to the quilt squares, and to the blue, fuzzy blanket I was using for a backing, with wrong sides together and a 3/4" seam.The blanket I bought was incredibly soft, but also quite thin so I ended up doubling up on it for the back.

I worried that attaching both backs to the quilt front only on the perimeter wouldn't hold the quilt together very well, so I top stitched (on the squares seams) a few lines through all the layers. Nothing fancy. Just something subtle to make the blanket more durable. When the quilt was all pieced together, I cut snips in all of the seams and threw it in the washing machine/ dryer. This helped make the raggedy look I was hoping for.

Of course, over time with snuggles and more washings the quilt will grow more and more raggedy at the seams and so it will look even better with age. Can't wait to snuggle my newborn in it this fall!

Sunday, August 12, 2012

Lace Dress {How To}

Details for how I made the purple lace dress I wore on my hot date, as promised:
My inspiration came from this dress over at ASOS Maternity costing a whopping $74.57 (plus shipping). I love that its cute and flirty, but I doubted it'd provide enough coverage and for 80 bucks or so I had better love it! So I brainstormed and must have sewn my own version together a hundred times in my head before I had the guts to cut into any fabric. The good news is, making this dress myself only cost $30.00 (Should have cost less, but I didn't have a coupon when I bought my lace. I splurged!)

I began by creating a bodice pattern. I decided to use an old bed sheet so that I could sketch out the bodice front and backs to both McCalls 6321 and McCalls 6102 and then sketch in my own ideas as well. I figured combining these would help ensure the right fit, a good match for the sleeves I had planned on using, and produce the dress I was envisioning all at the same time. I cut and sewed then tried it on only to cut and sew some more. Once I finally had the bodice pattern how I liked it, I knew the rest of my dress would come together successfully. It was just a matter of sewing with satin and lace (two fabrics I consider to be tricky) and figuring out how to combine my pieces into one dress.
Sketching out bodice front
Sketching out bodice back

I sewed two separate bodice pieces. One out of lace, the other out of the purple satin. I sewed the lace portion together using a 3/8 inch seam, and sewed the purple satin layer together using a 1/2 inch seam. I hoped that this tiny difference in size would help them layer together easier. Then, I sewed them together at the neckline by layering them together lace bodice inside purple bodice, both pieces right side out. When I flipped the purple satin to the inside through the neck, the neckline seams were hidden, and the side seams all faced inside the dress where they wouldn't be seen. In addition to connecting the two pieces, this helped make a clean finish around the neck.


I tried to use McCalls 6321 to create the sleeves. Because I wasn't using stretch lace, I figured these sleeves would allow for more freedom in movement and they'd be cooler than anything tight on my arms. What a nightmare! For the life of me I could not figure out how they achieved the look! I felt like I was trying to figure out origami for an hour before I was resolved that the McCalls company clearly had a misprint and left out some very key information. That's when my husband glanced at the directions and thought he'd give it a try. Would you know it, he had my sleeves folded perfectly in less than 30 seconds. Good grief. Thanks babe. But, after all that work, I hated them! I tried shortening them, adjusting the layers, and they still looked boxy and- well, just awful. I cried. In the end, I sketched my own pattern for some cap sleeves. I figured the smaller the sleeve the better because I was quickly becoming lost in this dress. I mean, this is a lot of lace and the closest thing I normally get to lace is pinning pictures on pinterest!

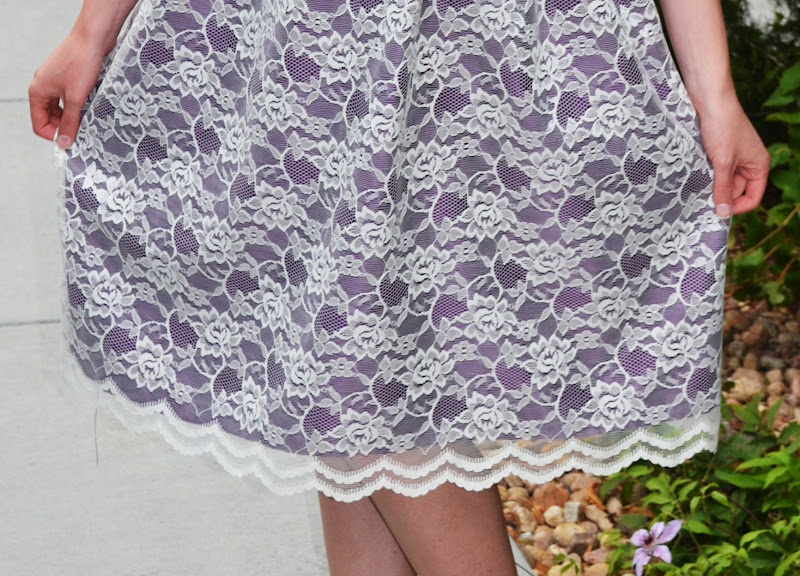
For the bottom of my dress, I made a full skirt out of both the lining and the lace. I hemmed the lining, and left the lace unfinished because of it's lovely design. My husbands input had me leaving the lace a couple inches longer than the purple too. The skirt pieces were only attached at the top where I basted them together before sewing in two strips of gathering stitches. I tried to gather the skirt more in the front than in the back to make plenty of room for my pregnant belly. Then, I attached the skirt to the bodice above my belly.
I chose to add some feminine detail to bring out the purple and accentuate my baby bump. 
The dress slides on over my head so I opted out of adding a zipper to one of the side seams. Believe me, I had already spent WAY too long on this project, I did not want to see to one more detail!