


I began by creating a bodice pattern. I decided to use an old bed sheet so that I could sketch out the bodice front and backs to both McCalls 6321 and McCalls 6102 and then sketch in my own ideas as well. I figured combining these would help ensure the right fit, a good match for the sleeves I had planned on using, and produce the dress I was envisioning all at the same time. I cut and sewed then tried it on only to cut and sew some more. Once I finally had the bodice pattern how I liked it, I knew the rest of my dress would come together successfully. It was just a matter of sewing with satin and lace (two fabrics I consider to be tricky) and figuring out how to combine my pieces into one dress.
 |
| Sketching out bodice front |
 |
| Sketching out bodice back |
I sewed two separate bodice pieces. One out of lace, the other out of the purple satin. I sewed the lace portion together using a 3/8 inch seam, and sewed the purple satin layer together using a 1/2 inch seam. I hoped that this tiny difference in size would help them layer together easier. Then, I sewed them together at the neckline by layering them together lace bodice inside purple bodice, both pieces right side out. When I flipped the purple satin to the inside through the neck, the neckline seams were hidden, and the side seams all faced inside the dress where they wouldn't be seen. In addition to connecting the two pieces, this helped make a clean finish around the neck.


I tried to use McCalls 6321 to create the sleeves. Because I wasn't using stretch lace, I figured these sleeves would allow for more freedom in movement and they'd be cooler than anything tight on my arms. What a nightmare! For the life of me I could not figure out how they achieved the look! I felt like I was trying to figure out origami for an hour before I was resolved that the McCalls company clearly had a misprint and left out some very key information. That's when my husband glanced at the directions and thought he'd give it a try. Would you know it, he had my sleeves folded perfectly in less than 30 seconds. Good grief. Thanks babe. But, after all that work, I hated them! I tried shortening them, adjusting the layers, and they still looked boxy and- well, just awful. I cried. In the end, I sketched my own pattern for some cap sleeves. I figured the smaller the sleeve the better because I was quickly becoming lost in this dress. I mean, this is a lot of lace and the closest thing I normally get to lace is pinning pictures on pinterest!
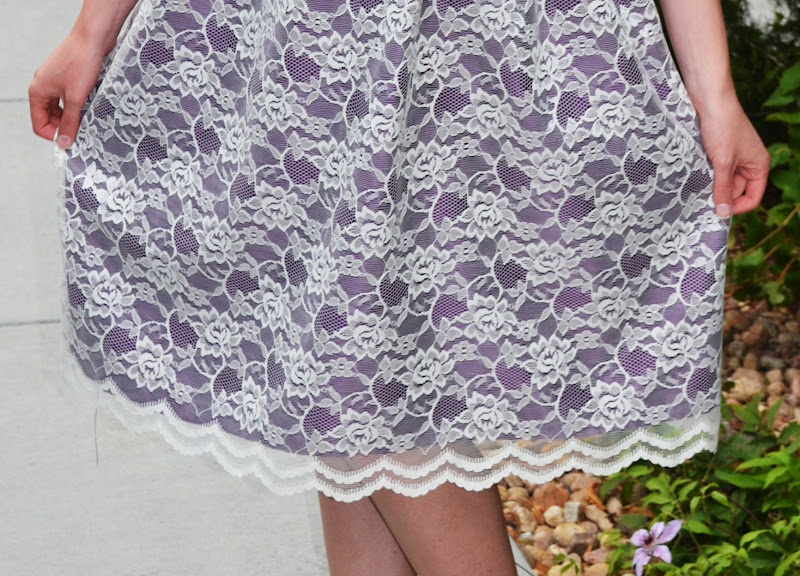
For the bottom of my dress, I made a full skirt out of both the lining and the lace. I hemmed the lining, and left the lace unfinished because of it's lovely design. My husbands input had me leaving the lace a couple inches longer than the purple too. The skirt pieces were only attached at the top where I basted them together before sewing in two strips of gathering stitches. I tried to gather the skirt more in the front than in the back to make plenty of room for my pregnant belly. Then, I attached the skirt to the bodice above my belly.


Such a pretty dress, Jessica!
ReplyDeleteHow pretty! Thank you for the tutorial! -Marci
ReplyDeletehow very pretty
ReplyDeletecome see what we shared at http://shopannies.blogspot.com
You look adorable, what a cute, cute dress!
ReplyDelete***Stopping by from the Make It Pretty Monday hop, have a wonderful week. :)
Ahh this is such a beautiful dress, so brilliant for maternity too because as you get bigger you will just fill out the skirt.
ReplyDeleteI meant to sew so much more through my pregnancy and just never got around to it!
I have managed to make a lot for the nursery though... if you are interested in seeing just stop by homebirdeconomics.blogspot.co.uk
Natalie x
I think yours is much nicer than the ASOS one.
ReplyDeleteBest of luck with the pregnancy.
Sarabeth
Life of an Agnostic Sunday School Teacher
Way too cute dress! Thank you for sharing this at my Make it Pretty Monday party at The Dedicated House. Hope to see your prettiness again on Monday. Toodles, Kathryn @TheDedicatedHouse
ReplyDeleteAwesome.............!!!Love the pattern.
ReplyDeletewww.blissfulsewing.blogspot.com
I can't believe you made that! Great skill girl :) Found you from MMB :)
ReplyDeleteThat dress is gorgeous! I am really wishing I knew how to sew right now!
ReplyDeleteModern Modest Beauty
Your dress is beautiful!
ReplyDeleteBramblewood Fashion
This is so pretty for maternity dress. Thank you for the inspiration!
ReplyDeleteVisit me:
LeeAnne, Style N Season
http://stylenseason.blogspot.com
that dress is soo pretty!!
ReplyDeletexo,
Sandy
Sandy a la Mode
Such a pretty dress! I love this! I wish I knew how to make dresses!! Found you from Sunday Style!
ReplyDeleteThat dress is beautiful! I am so impressed with how you made it. Nice work!
ReplyDeletepreethi
lace, etc.