What do I blog about?

Wednesday, February 22, 2012

Birthdays and Game Shows

My husbands birthday is the day after Valentines Day so we choose to skip the love holiday and just celebrate his day. I joke that he really lucked out, but the truth is: I'm happy to skip the sappy day. Just one more thing to plan for and buy for in the midst of all three of our birthdays that come around, beginning with his, within four weeks of each other. Our wonderful neighbors came over to play with our daughter so that we could have a date night. We left our small town for the larger small town up the highway and hit the fantastic sales at Old Navy before feasting on red robin burgers now complete with a gluten free bun! Heck yes! The staff brought over balloons that he had to tie around his ears while they sang to him.

I threw myself a little game show party that was a hoot! Five of us couples, ranging from 11 months married to 3 1/2 years, played the Newly Wed game. Not sure what that is? Basically we separate the girls from the guys and answer questions, and then bring every one back together and see if the couples answered the same. It worked out perfect because our neighbors let us use their apartment too; no cheating and listening in on answers from across the way! Watch this clip here from the original tv show to see how the game works. And, heck, just because this one is so funny you may as well watch this one here. I'm still smiling from the silly blondes responses. Anyway, my husband and I took turns playing game show host. Me for the girls, and him for the guys.
Here's the group!  Our silly daughter decided on new parents for the night.
Our questions started out tame... how the heck did one of the couples know he would be a flying unicorn if he could be any animal? My husband and I both answered that he would be able to get more phone numbers than I could if we were to take to a competition on a night out. Awesome that we got a point for answering the same... but, hey- come on now! Kudos to everyone for getting the location of their first kiss right, and answering no, of course the wives didn't turn into bridezillas while planning the wedding; even if some girls gave their men rather low ratings for helpfulness in planning the big day! 

I think the real fun began when we answered questions like where our most unusual place we've made love was, how we know the other one is in the mood, and which movie title would we use to describe our romantic encounters: A. Finding nemo, B. Gone in 60 seconds, C. Super man? Oh the laughs and embarrassed giggles!

Finished the night out with a chocolate cake with raspberry filling and vanilla pudding whipped cream frosting and everyone singing happy birthday to me. It really was a fun night. Maybe we'll have to get together, with new questions, and play again sometime soon!

Sunday, February 19, 2012

Living Room Face Lift


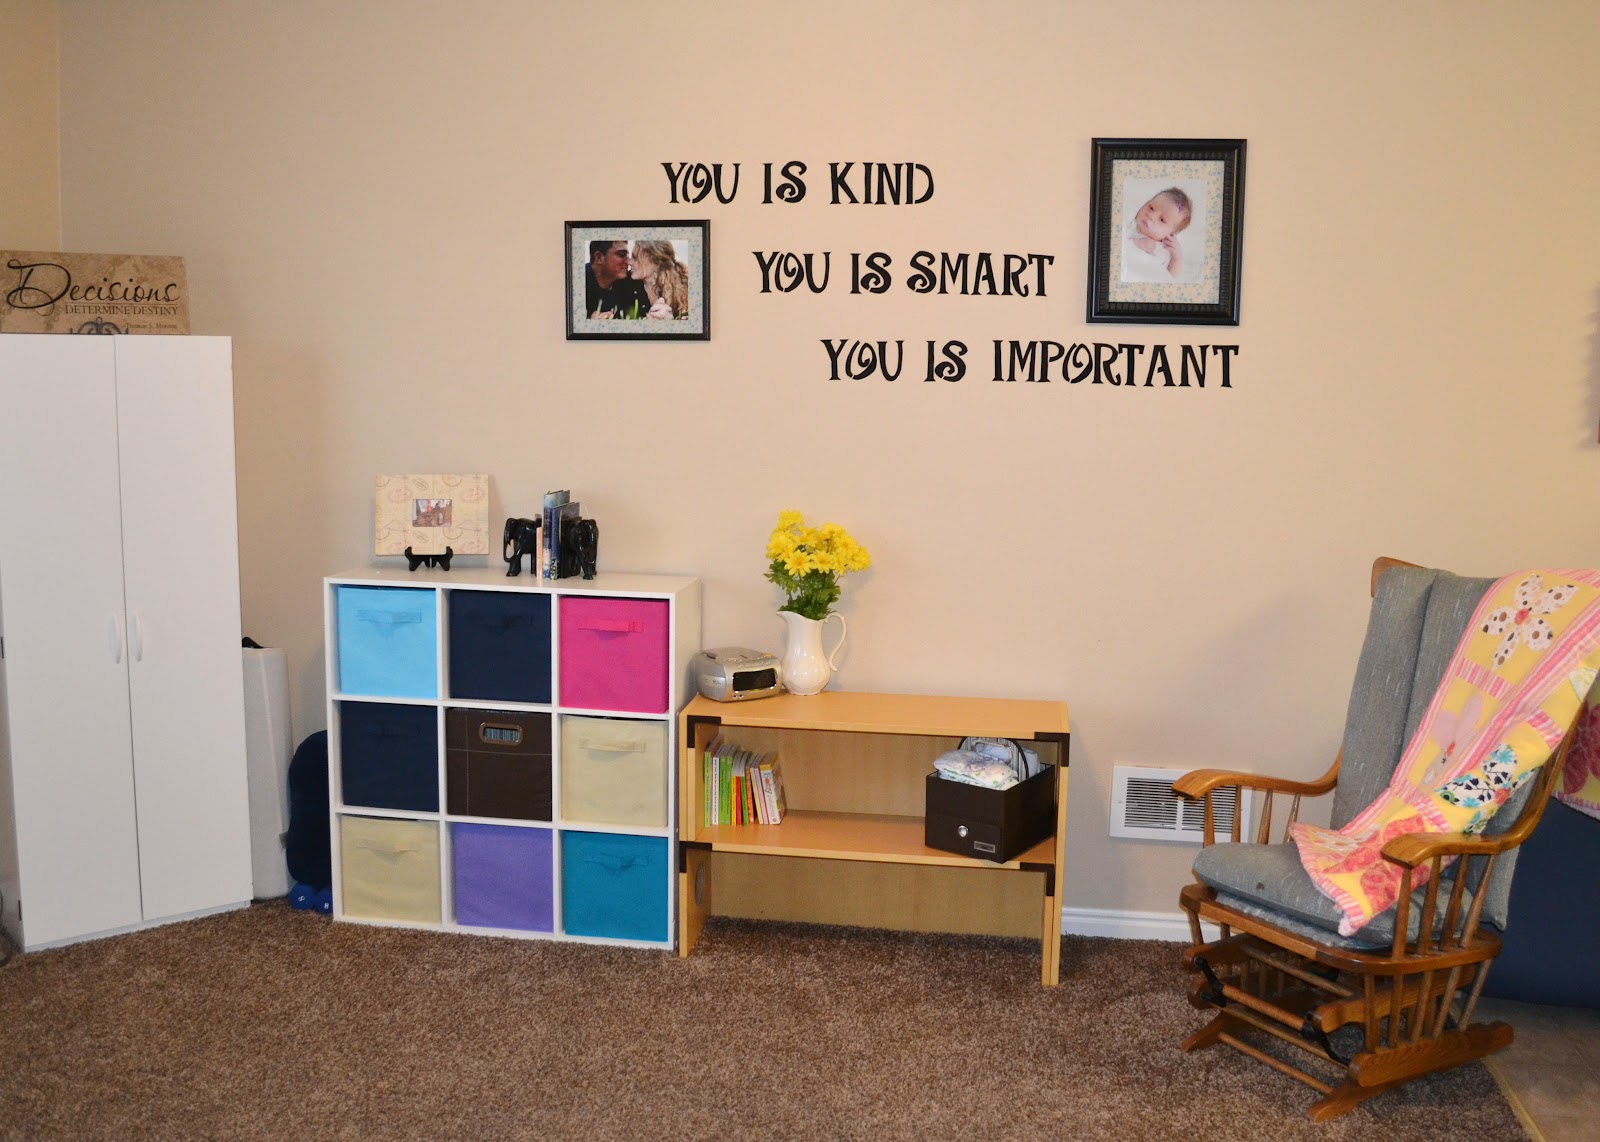
We've always had a rather plain living room, but when we sold our TV the large empty wall screamed out for help! With five dollars and only an hours worth of rearranging furniture and painting fabric letters with corn starch and water, our home looks a lot better!
Before:
After:
When I read The Help by Kathryn Stockett, I was touched by her character, Aibileen Clarks, commitment to offer up consistent positive reinforcement to the little girl she looked after. Her phrase, "You is kind. You is smart. You is important." caused me to related to the little toddler who was so lucky to have her. Don't we all need to hear wonderful truths about ourselves? I started whispering her words in my sleeping daughters ear, then I'd tell her them while we played, and finally I began to repeat the phrase whenever I was at my wits end dealing with the fussy mischievous version of my little girl. We all need to be reminded of our best, when we are at our worst! (I may or may not be referring to myself and not my kiddo here.) My husband and I rented The Help as a movie and I was so pleased when he told me, on his way out the door, that I was kind. I was smart. I finished for him, "and you is important!" We've adopted this as our family slogan and it only made sense to display it in our home with our family photos. I need to replace our daughters one day old picture with a more current one...

I traced stencil lettering onto black fabric and "pasted" them to our wall. Seriously, it really was that easy! I even did a tester dot around the corner to make sure it would peel off without harming the paint job. It did. I've seen this technique floating around pinterest, and even came across a blog where a woman "wall papered" a whole room using starch and fabric. Rumor has it, once you peel the fabric off the wall you can wash it and sew with it later! So, what's the recipe? 

I mixed 1/8 cup of corn starch with 1/4 cup of cold water and set it aside. I brought 2 cups of water to a boil and then added the corn starch mixture. I boiled it for about thirty seconds and then let it cool before using a paint brush to paint the back of the letters, stick the letters to the wall, and paint over the front of the letters.

Wednesday, February 15, 2012

Mans Dress Coat

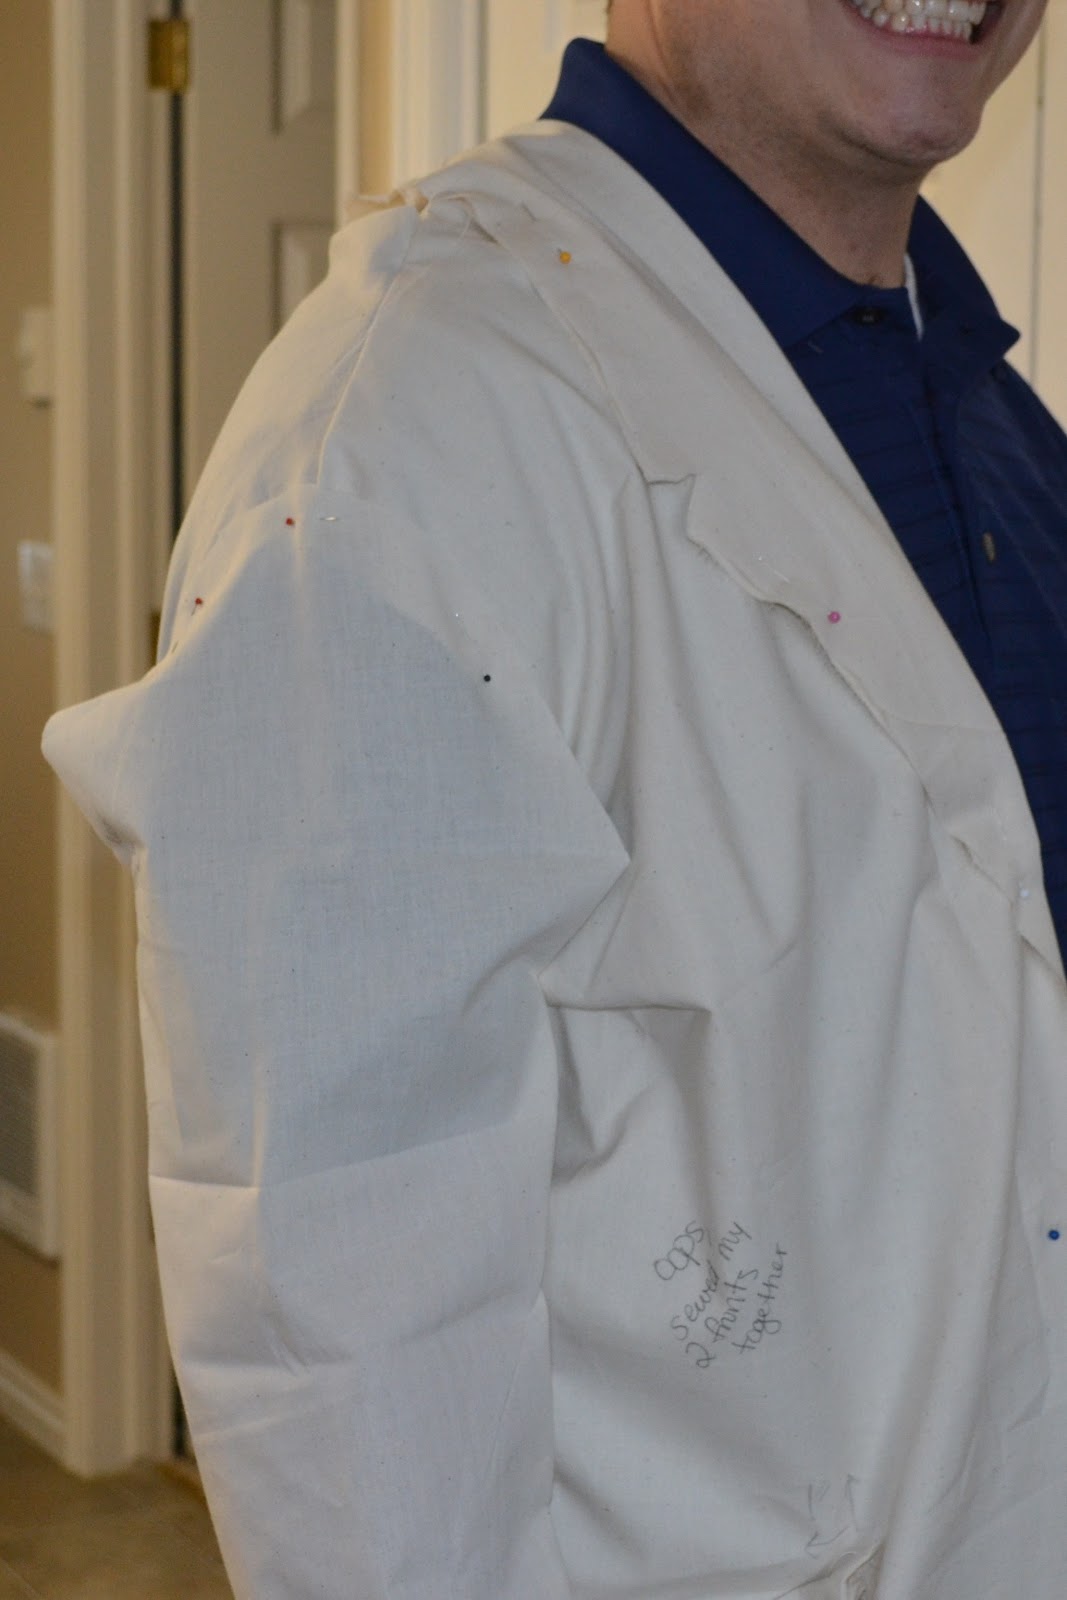
I have the best husband in the world. He works hard and studies hard to provide for his family, is a ton of fun to be around, and totally supports me in my crafting. When I say totally, I mean 100%. He's encouraging, gives praise, brags about me to co- workers, even goes to Joann Fabric stores with me and picks out notions or stands in line to get fabric cut. What a stud! So, for his birthday today (happy birthday babe!) I wanted to make him something great to tell him thank you. I decided on a nice, handsome, coat. And, doesn't he just make it look great?


This was quite the project! Why are there not more patterns for men? I bought vogue 8720 (on sale for 3.99) since I liked the belt, the pockets and the bottom of the back. I also bought McCalls 6143 (on sale for 1.99) since I liked George Washingtons single button front and Abraham Lincolns collar and sleeve.
M6143
V8720
 I basted and pinned my mismatched pattern pieces to form a trial coat out of cheap muslin fabric, and once I embraced the learning process- I had a blast! I had my husband slip it on and I started scribbling all over it! I wrote Oops! Don't sew this. And, add seam allowance here. I drew arrows for a better pocket placement and lines to re shape the collar and arm attachments. I also had to change the shape and size of the arms, back and shoulders as my husband is apparently broader and stronger (and therefore, sexier) than both George Washington and Abraham Lincoln.


 I was more cautious when I cut and sewed the wool as it was 26 dollars a yard! (On sale for 40% off; I still spent 65.00 for his coat, plus 20.00 for the static free lining.) The past two days have been an ongoing cycle of pin, baste, try on, adjust and sew while our babe napped and slept into the late hours of the night. The two hardest elements for me were the pockets with a welt as I had never sewn one before, and the collar. The pockets I am satisfied with, even proud of, since I did eventually figure them out all on my own. The collar is my frienemy. (Friend/ enemy.) I think it looks good... It just isn't as sharp and crisp as I envisioned.
I realized somewhere in the middle of making the coat that I hadn't allowed for an over lap that would be necessary when adding buttons. Shoot! [Allow for a few seconds of panic, a few pessimistic I hate sewing phrases...] I found a solution! The end result helped with the over all fit of the coat as it added an inch to the width and looks really nice because of the top stitching. Since I think this will come in handy for future projects, I'm going to post a mini tutorial here.


All together, including the buttons, thread, and muslin (I used four yards of wool and lining) his coat cost less than 120$. I think that is great especially compared to this brown coat from Nordstrom originally priced at 595$ and currently on sale for $399!
Nordstroms Wool Coat

Adding width and button strips

I came up with this out of desperation while making my husbands nice coat for his birthday. (Will be posting about that soon.) It ended up turning out great and I'm sure I will be using this method for future projects. It'd be helpful when turning a shirt into a cardigan, converting a jacket into a maternity garment, or adding width to any coat or vest.

1. Cut two strips of fabric the length of your garment seam that you are adding on to, and the width of your choice. I cut mine 33 inches long as that was the length of jacket that needed buttons, and 5 inches wide. The finished product had just over an inch of expansion on each side.

2. Lay your strip down on the edge that you will be attaching it to, right sides together. Pin and sew a 3/4 inch seam.
3. Fold the unsewn edge so that it lines up on top of the stitched line.
I am pointing to where the edge lies on top of the stitched line
4. Now, Turn the fold over at the edge/ stitched line. All raw edges will disappear as they will be underneath. Pin in place.
This fold seam here on the right, the side with the pin closest to it,
is where the stitch line and edge lie underneath.
5. Top stitch 1/4 inch in from both the edge and the seam. Add buttons or button holes if you so choose.
The seam on the right is where the coat front used to end,
what I am holding is the extra length.

Monday, February 13, 2012

Magnetic fridge envelopes

I'm alright with the toys that always clutter our living room floor. I'm even ok with a pile of dirty dishes by the sink. But, for some reason, I can't stand a messy refrigerator-inside or out! We have collected a variety of mismatched magnets and they have been holding up lists, notes, coupons... for a while now. I just can't take it anymore!

I pulled out my scrap book paper and folded it into over sized envelopes. To the plainer of the bunch, I added lace or ribbon. I Slapped some magnet strips on the back of them, and finished them off with wooden close pins, mostly because I like the way they look, but also because they help to keep the envelopes closed and our fridge surface neat. I labeled the envelopes and sorted our lists and notes accordingly and then stuck them to the side of our fridge.

Sunday, February 12, 2012

Linky Followers- help me out!

So... I signed up for linky followers since I have been led to believe that doing so was necessary to keep a blog following, and also that it is "easy" to use. Anyone else out there using it? What can you tell me about it? I can't decide if it really is that simple, or if I am missing something. All it is is a place to manage your followers, and the blogs that you follow... correct? What is this talk of widgets?  Of course, I think I'll enjoy it more as I grow the collection of blogs that I am following and therefore have more to see. Let me know if you're using it, so I can hop on over and follow you. Please take the time to follow me. Scroll to the bottom of this blog, when viewed from my home page,  and you will see my linky followers box that will prompt you to follow along.

Thank you!

Friday, February 10, 2012

A Day in the Life

Our day begins at eight o clock when baby girl wakes up and we share a bowl of cinnamon banana oatmeal. She can say banana now: Na-na-na. She hasn't been very fun to share with lately though- little girl wakes up hungry! Then, she exercises her independence by ignoring me and exploring our apartment. There is always something new she discovers, a drawer she'd never before considered opening for example.

I love to sit back and watch her. She does the sweetest things when she is in her own little world. I've caught her walking whereas under normal circumstances she insists she cannot by going limp noodle when I hold her hands and crawling away from me with a snarl. Sometimes she has long baby babble conversations with her stuffed animals, or creates music by strumming the heater vents and flicking the springy door stops. After a while her sweet independence turns into chaotic mischief and I invite her to do chores with me. She can remove dirty dishes from the dish washer faster than I can load them and unfold laundry faster than I can fold it. I'm learning how many different ways there are to say no... and so is she! There is the sweet no with a quick shake of her head to tell me when she is all done eating. There is the no combined with the continuous shaking of her head while she turns the tv on and off and clicks the volume louder... louder... and louder!  It's as if she is saying, I know I'm not supposed to- but I'm gonna anyway! There is even the spunky no accompanied by the sideways head and body bob that I know would be used in conjunction with a finger snap and an oh no you didn't if only she were able. Where in the world does she get this attitude?

If I know I'll have somewhere to go later in the day, we'll hop in the shower. She loves playing in the water; just crawls around, splashes and plays with her toys in the tub while I take my shower. It's back to Head and Shoulders for her little scalp; that awful cradle cap strikes again! Lately, she's been a shower terror. Turning the water all the way hot or all the way cold, or pulling open the shower curtain to blast me with cold air. This introduces a whole new string of "NO"s! All I can really do is laugh.

After a couple of hours it is nap time so we warm up a bottle of organic, hormone/ preservative free milk and cuddle up together on the couch. Sometimes, I let her feed herself. She does good for a little bit, long enough for me to take this adorable picture!

But then, because she is such a good little girl, she tries to share and feed me the bottle. I love this age. She is finally on a consistent nap schedule; taking two hours naps, twice a day spread out on her tummy and sucking on a binki. (Thus all my time available for sewing/ crafting!)

We both enjoy our afternoons a lot more when we socialize. So, when her daddy can't be home to play, we like to have our friends and neighbors over. Baby girl waves enthusiastically, sometimes with both arms, whenever someone shows up on our doorstop. As of yet, my daughter has never gone through a shy phase or even shown a preference for me, her mama. As long as someone is talking to her, maybe letting her try out their coat zippers or go through their wallet/ purse, she is happy. (She used to have an aversion to men with beards, but lately even they make good playmates... better than the alternative to actually sitting still during church anyway!)

I consider our day a success if she has eaten at least one vegetable, and at least one fruit in addition to her morning banana. She's past the baby food stage, but doesn't always remember to chew her solid foods. (Or gum them rather, since she only has her front bottom teeth and her front teeth are just starting to poke through.) She likes sweet potatoes in fry form, frozen peas, carrots and corn, thawed of course, apple sauce, cheese and just about anything that comes off her daddy's plate. (Gotta be cool like him! I roll my eyes.)

Bed time comes at seven o clock and baby girl drinks a whole ten ounces of milk while we listen to lullabies. If she's feeling sweet, she'll give me a kiss good night... otherwise she just tells me no. And then it's good night baby, see you between one and three in the morning when we snuggle beneath the blankets in my bed and nurse another bottle.

Tuesday, January 31, 2012

First year outfits turned flower quilt


I had outfits for my daughter months before she was even born. Before I ever got to snuggle her, I had developed attachments to those tiny clothes. During her (almost) first year of life, I packed up and sent to storage the new born onsies, the 0 to 3 month shirts and the 3 to 6 month pajamas one right after another as she outgrew them. Almost all of them that is. Some were too stained from leaky diapers and spit ups, others were monogrammed or held very specific memories making them too her for a future sister to wear as a hand me down. So, what of the clothes that weren't fit for storage but too dear to throw away? I decided to quilt them. And yes, I cut around the stains.

I've never sewn a quilt before, but I'm happy with the way it turned out. And, the best part is that each flower holds a special story like the one made from the onesie she wore to her Uncles high school graduation, or the pajamas she wore when she first learned to crawl.

The quilt ended up being 60 inches long and 54 inches wide, made up of four rows each with five flower squares in it. Here is how I made it:

In addition to the normal sewing necessities (scissors, thread...) you will need

1. One and a half yards of 60 inch soft fabric for the back of the quilt
2. Fleece material cut into 20 squares that measure 11 inches x 11 inches
3. Baby flannel material for the boarders cut into five strips 4 inches by 64 inches, and 24 strips 3 inches by 11 inches (you can use any material, but I was going for cozy and soft when I chose to use flannel.)
4. Fabric for the flowers. Mostly, I used baby clothes here. I made twenty flowers with five petals each, so you will need to cut 100 football shaped petals that measure no more than 5 1/2 inches long. I also cut out twenty circles about the size of a 50 cent piece for the flower centers. Just grab a piece of paper and sketch out a petal, cut it out and use it to make all your fabric petals the same size. Don't be scared, there is no right or wrong petal shape!
*Wash and dry all fabric prior to starting this quilt.
These strips will form the borders around the quilts squares

Fabric flower petals and center
First, pin the flower petals onto the fleece squares right side up (one pin will do per petal; the fleece keeps the petals from sliding around)

Sew them in place a quarter inch from the edges. Also, sew on the flower centers.This is the most time consuming part, once you make all twenty flowers you are just about done!


Next, arrange the squares how you will want them to look in your finished quilt and start pinning and sewing the short strips of flannel on the top and bottom of the squares. Allow for a half inch seam.
Make sure to end up with four rows of five squares. (Pin the strips in place by laying them on top of the fleece squares right sides together. Look at the yellow square in the top right of the following picture for clarification. This way, you won't see your hems as the quilt goes together.)
3 of the 4 rows, each with five squares, are shown here
If you need to, trim the edges so that everything is straight for you to pin the long strips of flannel to the edges of the rows. Again, right sides together and then sew allowing for a half inch seam.


ah- lovely borders
After creating all of these lovely borders, but before you attach the back to the quilt, wash the quilt. I know it isn't dirty, and I know you pre shrunk all fabric... Washing and drying it now (even in a light, gentle cycle without soap and the low heat dryer setting) will allow for the flower edges to fray ever so wonderfully. The reason I did this now and not after I attached the quilt back was in case something frayed too much and I needed to do some fixing. This way I could get to the area without having to first remove the back. Don't worry though, nothing needed fixing. Like I said, just in case...
Notice the shaggy edges?
Spread your quilt out on the floor with the backing fabric laid on top, RIGHT SIDES TOGETHER. Pin the perimeter and sew all edges together. I chose to pin one side, sew, pin another side, sew... Just remember to leave about ten inches open so you can turn your quilt right side out.
RIGHT SIDES TOGETHER

Pinning the perimeter

Ok, now turn your quilt right side out through the opening that you left on one of the edges. Hand stitch the opening shut. And, ta-da! Smile.


Monday, January 30, 2012

Family recipes now online!

In an effort to help me figure out what to cook each day, and hoping to make finding my recipes easier, I have moved all our family recipes to an online source. They are organized into a variety of categories so that I can search for them based on what ingredients I have on hand, what occasion I need to be cooking for, how much time I want to spend preparing dinner, if I'm using the croc pot or the cast iron skillet, who in my family originally made the food... You get the picture.

Some of our favorites include fish tacos, green chili pork, sloppy jos, and apple pie. 

Click on the Tons of Recipes tab above to check it out!

Saturday, January 28, 2012

Q and A about the pleated wrap skirt

I got asked a question today about the pleated wrap skirt tutorial that I have posted. (Go ahead and click here to see what skirt I am talking about.) Someone was wondering how exactly it ties and whether or not there was a button hole to thread one of the ties through. That was a great question; it is actually one that I had when I first started to make the skirt. Alas, I did not use a button hole and I promise it all ties up very nicely. The ties just cross one over the other. I took some pictures just now to try and show this.
Notice on the left of the picture how the ties over lap?
Just keep the band flat against your waist as you wrap it around you, this way it won't get bulky when it crosses over.
This shows the waist band overlapping itself. If I had finished the bow, the cross over would have been hidden.

Tuesday, January 24, 2012

Versatile Blogger Award

Pam at Threading My Way totally made my day last week when she passed on the Versatile Blogger Award to me! Thank you Pam, I'm honored.
And, now it is time for me to pass it on. Here is how it all seems to work:

There are rules for accepting the Versatile Blogger Award:
  1. Thank the award-giver and link back to them in your post.
  2. Share 7 things about yourself.
  3. Pass this award along to 15 recently discovered blogs you enjoy reading.
  4. Contact your chosen bloggers to let them know about the award.
OK... 7 things about me:
  1. I am a massage therapist.
  2. I knew my husband when I was a little kid.
  3. I used to con my grandma into sewing me clothes by telling her that this time I really did want to learn.
  4. My favorite food might be cole slaw.
  5. Swimming laps is my favorite form of exercise.
  6. I spent a summer in East Africa and would love to go back there someday.
  7. I went through a phase in pre adolescence where I would only speak pig Latin.
And now... 6 blogs I enjoy reading, in no particular order:
(I know, I know, the rules say 15 but 6 is just going to have to do- I have a ten month old after all and she does not like sharing me with this blog.)

1. Better With Age Jamie posts pictures of before and after projects she does around her house. And, she has made her home beautiful!
2. NatSprat is actually one of the first blogs I ever followed. Nat has really cute tutorials and blogs in a way that makes you feel as if you know her.
3. Welcome to the Good Life I started following Sarah because of her fashionable sewing skills, but I fell in love with this blog when her husband hacked her account to leave a very sweet Birthday message to her. Such love there!
4. The Sassy Pepper. I always love a blog with good tutorials, Sassy and Pepper also have a super cute etsy shop.
5. Lots of Pink Here Amy says she sews to keep herself sane! She has a patchwork sewing kit tutorial that I'd like to try out.
6. Dumped and Discovered is a fantastic blog about finding beauty in discarded items. I love the end results and I might just get brave enough to up-cycle some furniture around here!

Head on over to these fabulous blogs and say, Hello. I think you will find good ideas and inspiration from each of them.

*If I've passed the award on to you and you'd prefer not to pass it on, no worries.

Saturday, January 21, 2012

Link Party Headband

I have really been enjoying Threading My Ways link parties. Pam posts a new, themed link party every week, and they remain open. This makes them a perfectly organized source for continual inspiration. Link parties that have already taken place are Bags, Girls Dresses, and Womens Dresses. This week is Hair Accessories. Here is what I have to contribute:
Flower head band with lace and brown feathers. 

Everything was attached either with fabric glue or hot glue, is there a better way?

By the way, if you haven't done so yet, make sure to view my previous post (below after returning to my home page) and enter to win my lace tote giveaway!