What do I blog about?

Wednesday, October 31, 2012

Halloween continued...

The Halloween festivities continued today! We went trick or treating with good friends at the library...

 Awe. The Garden Gnome and The Baker. 
This is NOT dad's favorite picture:


Then, we went trick or treating up and down a street we have in town lined with medical and law offices. This is where it was at! These doctors, dentists, optometrists... were so generous with their handfuls of chocolate bars! We also got tooth brushes and eye classes cleaner. Cool, huh? Despite how heavy her little candy bucket got, our little girl had a firm grip on that handle; almost as if she didn't trust us not to sneak a piece or two! After dinner, we headed back out to the church to do a bit more trick or treating there! My goodness! What a busy, full day it was! Holidays like Halloween are so much more enjoyable when seen through a childs eyes. How blessed we are to live in such a great community.


Halloween Eve at the Zoo!

To think that only a couple days ago I was all set to skip this fun day... Even as I began to accept the fact that I wasn't going to be cuddling a newborn yet, I reasoned that my little girl is too young to care and preparations really weren't worth the effort! Boy am I glad that I changed my mind! I was motivated by the number of awesome individuals who offered to take our daughter trick or treating for us, so Monday I worked like a mad woman to create our attire.
 Our aprons read:
"We have a BUN in the oven!"
And,
"Kiss the Cook"
 Details to follow on the making of her chefs attire!
We spent Halloween Eve at the most adorable little zoo in the next town over. Thankfully their theme was merry- not scary! The weather was perfect and our daughter was so well behaved. She loved watching the monkeys, and the wallabys made her laugh. She held out her little candy bucket to trick or treat to all the staff members not wearing masks, and she stayed way away from the star wars characters!

The zoo also hosted costume contests and we took 2nd place in the family category! I think the judges favored home made costumes, and we made them laugh with our "clever idea." From where he was standing, the mayor could read my husbands apron best so while he was announcing the 2nd place winners he asked me, "Do you really kiss the cook?"

I replied, "That's why we have a bun in the oven!" To which he made me repeat in the microphone. I blushed. A lot. And he congratulated us and told us that his name was a great name for a baby boy! So, we won 2nd and it came with a big ol' root beer, a gift certificate to get some pizza, and we snagged a picture with the good mayor too.

Sunday, October 28, 2012

Chalk Board Kitchen Art


Growing up, my mom made delicious home made breads. Nothing quite like walking into a home filled with the aroma of fresh baked bread now is there? She always cut the loaves on her wooden bread board, the same bread board that I happen to have in my possession now, but that never gets used for serving amazing bread any more. So, what to do with it? I turned it into some functional kitchen wall art!

I turned it over and went to work on the back of the bread board. All it took was a little bit of sanding, masking, and chalk- board- paint painting. I used letter stickers for What's For Dinner and dear husband screwed in the little hooks for me. I can use them to hang the chalk along with recipes and meal plans.
 

Wednesday, October 24, 2012

Circle Skirt Tutorial (maternity friendly)

A while back, I made my very first circle skirt. I found an excellent tutorial at Dana Made It.com and I in no way want to steal any of her credit; she is, after all, the math genius who explained the method for creating a proper fitting circle skirt.She did a great job and I really appreciated having her tutorial. I am however, posting my own tutorial here for three reasons:

1. Dana walks you through creating a circle skirt pattern first. I'm a nap time sewer which means I'm short on time and would like to skip any steps that aren't crucial. No pattern needed here!
2. Danas measurements are for a skirt that requires no side seam. Great for little girls, or smaller women who also purchased 60" fabric. By adding one simple seam, my circle skirt fits more sizes and with less fabric too!
3. Instead of elastic, my instructions are for a waistband made from a 4 way stretch fabric. This is less rigid than thick elastic and so I find it to be more comfortable. While it works for anyone, it is really wonderful for my pregnant belly. I like anything with a nylon blend, try looking near the dance/ swim section. Yes, this type of fabric gets pricey but you don't need very much at all and I can often pair it with a coupon! We're actually going to be creating something similar to the tutorial I have posted for a DIY belly band so if you like a stretchy jersey knit- that works too!

Ok, let's get started!
What you will need:
*2 yards of 45 inch fabric. (I bought mine on sale for 2.50/ yard at Joanns! Score!)
1/4 to a 1/2 yard of 4 Way Stretch Fabric (I like anything with a nylon blend.)
Scissors and other typical sewing necessities.

 * I am of average size and 5'7'' tall. Two yards of 45 inch fabric was enough for me to make this circle skirt about 21 inches long. If you think you will need it, you may want to consider buying a quarter to a half a yard more of fabric to achieve a larger and/ or longer skirt.

Begin by taking your measurements. Measure around your waist, or for those of us with a baby on board- measure under your belly. Then, add 2" to that number. This will be helpful when it comes time for the seam allowance and also for a slight gather to help the skirt pull on over your hips once finished. (Myself: 38 and 3/4 inches + 2 inches = 40.75")

Divide this number by 6.28 (Myself: 40.75 / 6.28 = 6.48  *I rounded to 6.5)

Multiply your new number by 2. (Myself: 6.5 x 2 = 13") This final number is what we will use to create our waist line!

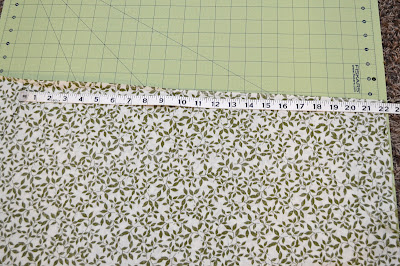
Fold your fabric in half, right sides together, and draw a collection of dots the distance away from the corner according to your final number. (Myself: 13") Sketch to connect the dots. This will create a nice curve, and makes a lot more sense once you look at these pictures:
My sketch is a little easier to see than the dots on my busy fabric!
Now, measure the distance from that curve to the end of your fabric on the shortest side. This will be your skirt length. Obviously, if you had purchased more than 2 yards of fabric you can make your skirt longer. I, however, found that I had 22 inches from the waistline I just created to the end of my fabric. Now is not the time to stress about whether or not you're going to like your final skirt length. Just take the measurement (mine was 22") and go with it.You can always hem it to be shorter later.
Make another series of dots to create your skirt length and once again, sketch to connect those dots. See pictures:
Cut out your skirt along those two lines.
One side of your skirt is on the fold. Pin the other side together and sew your side seam together with a 1/2 inch seam.

Set your skirt aside and focus on the waistband. Measure around your waist again and add 1/2 inch for a seam allowance. Decide how thick you will want your waistband, double that because it will be folded in half and add an inch for a seam allowance. (Myself: I want my waistband to be 5 inches thick, double to get 10" and add an inch for a total of 11 inches.) Cut yourself a rectangle with those measurements out of your stretchy fabric.
*Note: I should have written "Waist Measurement + 1/2 inch for seam allowance" on the vertical line
Sew up the side seam and then fold the tube like band in half.

Feed the top of your skirt through your waistband and sew raw edges together using a zig zag stitch. This is very important because it allows the thread to stretch with stretching of the waistband.

All you have to do now is hem the bottom of your skirt. Make your hem as thick or narrow as you want depending on how short or long you want your skirt.


Sunday, October 21, 2012

How to Ruin your Marriage- Don't make these mistakes!

[Joyful Finds Series]
Brought to you every Monday;
Beginning the Week with a Little Happiness
 
I REALLY love being married to my husband, and I am so grateful that we have as easy a time as we do in making our relationship a happy one. We don't yell, we don't fight, we don't name call and we don't take one another for granted. I mean... sometimes, though I always love him- I don't really like my husband... but those instances are rare and short lived. I always feel better after stomping around for a bit and try as I might, I can't go that long without laughing over something he says or does. Sigh. He's just awesome and I'm pretty lucky to have him! Anyway, there are tons of articles and blog posts floating around the internet about how to improve your marriage, how to make your husband your best friend, how to keep love a live... blah, blah, blah... I have no interest in reading those. But, I was intrigued when I came across a blog post entitled: 16 Ways I Blew My Marriage. It's author, Dan Pearce, totally cracked me up. Which is sad; I know. I was just sitting on my couch totally giggling over his failed marriage experiences. Poor guy. But the read is really good and I wanted to share it with you today. So, enough of my rambling, here it is: 16 Ways I Blew My Marriage, by Dan Pearce. 
 

Tuesday, October 16, 2012

Handsome Appliqued Onesies

I'm nearing the end of my pregnancy now, and preparations for a baby boy are in full swing! A while back I made a few handsome appliqued onesies... cannot wait until he is here and wearing these!  I absolutely love it when little boys dress like men. Maybe this is because I was lucky enough to have had such wonderful male role models in my life. I couldn't have asked for a better father, and my husband is the most genuine, dependable person I know. I am certainly going to be encouraging my son to emulate his daddy, and he can start at birth by wearing this handsome apparel.


I LOVE how these turned out- but I cannot believe how long something so tiny took me to make! Actually, I think the tiny factor was part of the problem. Little openings in little onesies are difficult to feed through the sewing machine. A *trick* I discovered along the way is to iron the applique onto interfacing before attaching it to the onesie. This not only keeps the applique fabric from sliding out of place while you maneuver the onesie through the machine, but it eliminates the need to fold under seams for a nice finished edge that won't unravel.

{Tutorial} Remember, if you need to- you can click on a photo to see it enlarged.


To make this handsome get up:
1. Create your template
2. Cut your fabric appliques
3. Iron appliques onto interfacing
4. Sew onto pre washed baby onesies.

The tie applique is very simple to make. Here is a picture of the pattern I created and used. The tie is 7" inches in length and I sewed them onto Gerber sizes 6 - 9 months. As Gerber runs small, I think a 7" tie would be perfect for other brands 3 - 6 months. Ties certainly don't have to be perfect; different widths and lengths can add character and charm!
I cut the top of the tie away from the bottom of the tie and angled the top piece on the fabric when I was cutting it out to resemble more closely how a real tie looks when worn by handsome grown up men. (Just an FYI: This awesome material was once my grandpas shirt, but then he handed it down to my husband who wore it a couple of times before I decided it needed to become a baby tie!)
The bow tie and suspenders I just kinda eye balled, but I created this sweet little vest like so:
I began by laying the onesie- folded in half- onto a piece of paper and marking where the edge of the onesie was, where the fold was, and where the shoulder seam was.
I drew a tab out a quarter of an inch from the fold line so that the vest would over lap at the center and then I just eye balled the rest of the lines in.
Here is the template I ended up with:
Once again, I sewed this vest onto a Gerber size 6 to 9 months.


Monday, October 15, 2012

Blog Angel Reveal

I always love getting to know fellow bloggers, so I eagerly signed up to participate in the October Series of Blog Angels put on by the super organized Rosie of Craftbotic. Now that the month is half over, it's time to reveal who we've been assisting thus far. I was assigned the very important role of being an angel to Jen at Frazzled 5. It's been fun following her and leaving her comments on her posts.

Jen seems like a great mama who is eager to get in the holiday spirit! Her last post was a clever, kid friendly craft window spooks.

Wednesday, October 10, 2012

Hats enough to share!


{Fleece Hat Tutorial Posted Below}


I'm making hats, hats, and more hats! As soon as they're finished, they're going to be packed up and sent off to the good people of Sew for Kids; the organization that sews together for the children of the Pine Ridge Reservation. And why not? I had a lot of fleece fabric scraps just sitting in my bin and I hear winters get dang cold in South Dakota! Sew for Kids posts a monthly project focus and October is dedicated to warm outerwear. Their site has lots of ideas, including free patterns and tutorials, to motivate sewers to help their cause. However, store bought donations are eagerly accepted as well!
I first heard about the above mentioned organization through the charitable blog, Hopeful Threads. This month, Hopeful Threads is dedicating their efforts in support of mothers and babies of the Pine Ridge Reservation through the Diaper Bag and Breasfeeding Program. Basically, this means: Attention sewers (or shoppers, remember you don't have to be crafty to help out) baby items needed! So, in addition to the children's hats I'm tucking away some burp cloths within the box to send off. If you're more talented and clever than I, they are in need of diaper bags, blankets, sleep sacks and many more items that you can read about here:  Hopeful Threads: October monthly project announcement.
I had a lot of fun making these hats. They're a quick project and they don't use very much material. I tried quite a few methods and sizes and here is what I ended up liking best.

Tutorial

1. Determine hat sizes. Here are the measurements I chose for the following ages:
Size by age- Head circumference x  Hat Height in inches.
Newborn - 14" x 6"
6 month old -  16" x7"
12 month old - 18" x 7"
18 month old - 20" x 8.5"
Two years and up- 22" x 10"

2. Cut your fabric. *It is very important to cut pieces out with the stretch going lengthwise!*

  • All sizes, cut 7 strips of fleece 5" x 1 1/2" (For the pom pom; adding this is optional.)
  • Then, cut two rectangles head circumference + 2" x the above hat height. So...

        Newborn size: Cut two rectangles 8" x 6" (the stretch should be along the 8" side...)
        6 month size: Cut two rectangles 9" x 7"
       12 month size: Cut two rectangles 10" x 7"
       18 month size: Cut two rectangles 11" x 9"
        2+ years size: Cut two rectangles 12" x 11"
  • Cut two more rectangles the same width and either 4 or 6 inches tall depending on size of hat...
       Newborn size: Cut two rectangles 8" x 4" (again, the stretch should be along the longer side...)
       6 month size: Cut two rectangles 9" x 4"
      12 month size: Cut two rectangles 10" x 6"
      18 month size: Cut two rectangles 11" x 6"
      2+ years size: Cut two rectangles 12" x 6"
3. Create the pom pom
Lay the 7 strips of fleece on top of each other and sew across the middle.
Cut the layers of each end into fourths.
Grab pieces from the edges and start tying them across the front. You only need to do this a few times, just so the pile starts to fill out in a pom pom fashion. Set aside.

4. Sew the hat
*For the newborn and six month sizes, I like to use a quarter inch seam allowance. For the bigger sizes, I use a half inch seam allowance.
  • Sew three sides of the big rectangles together with a zig zag stitch and a half inch seam allowance. I like to sew my seams twice so that they are extra strong as these are for kids after all! This is to form the hat.
  • Sew the side seams of the second rectangles together. This is to form the hat band.
 Now, fold the band in half with the seams lined up in the inside. The seams should be open flat.

Feed the hat, still inside out, through the hat band so that the three raw edges align. Sew again with a zig zag stitch and a half inch seam.


5. Finishing touches
Trim the had corners. Flip the hat right side out and fold up the hat band.
Now shape the hat by folding both corners of the hat in towards the center and hand sewing them into place. Attach pom pom to the top of the hat. Tack the hat band in place along the side seams.