What do I blog about?

Tuesday, January 31, 2012

First year outfits turned flower quilt


I had outfits for my daughter months before she was even born. Before I ever got to snuggle her, I had developed attachments to those tiny clothes. During her (almost) first year of life, I packed up and sent to storage the new born onsies, the 0 to 3 month shirts and the 3 to 6 month pajamas one right after another as she outgrew them. Almost all of them that is. Some were too stained from leaky diapers and spit ups, others were monogrammed or held very specific memories making them too her for a future sister to wear as a hand me down. So, what of the clothes that weren't fit for storage but too dear to throw away? I decided to quilt them. And yes, I cut around the stains.

I've never sewn a quilt before, but I'm happy with the way it turned out. And, the best part is that each flower holds a special story like the one made from the onesie she wore to her Uncles high school graduation, or the pajamas she wore when she first learned to crawl.

The quilt ended up being 60 inches long and 54 inches wide, made up of four rows each with five flower squares in it. Here is how I made it:

In addition to the normal sewing necessities (scissors, thread...) you will need

1. One and a half yards of 60 inch soft fabric for the back of the quilt
2. Fleece material cut into 20 squares that measure 11 inches x 11 inches
3. Baby flannel material for the boarders cut into five strips 4 inches by 64 inches, and 24 strips 3 inches by 11 inches (you can use any material, but I was going for cozy and soft when I chose to use flannel.)
4. Fabric for the flowers. Mostly, I used baby clothes here. I made twenty flowers with five petals each, so you will need to cut 100 football shaped petals that measure no more than 5 1/2 inches long. I also cut out twenty circles about the size of a 50 cent piece for the flower centers. Just grab a piece of paper and sketch out a petal, cut it out and use it to make all your fabric petals the same size. Don't be scared, there is no right or wrong petal shape!
*Wash and dry all fabric prior to starting this quilt.
These strips will form the borders around the quilts squares

Fabric flower petals and center
First, pin the flower petals onto the fleece squares right side up (one pin will do per petal; the fleece keeps the petals from sliding around)

Sew them in place a quarter inch from the edges. Also, sew on the flower centers.This is the most time consuming part, once you make all twenty flowers you are just about done!


Next, arrange the squares how you will want them to look in your finished quilt and start pinning and sewing the short strips of flannel on the top and bottom of the squares. Allow for a half inch seam.
Make sure to end up with four rows of five squares. (Pin the strips in place by laying them on top of the fleece squares right sides together. Look at the yellow square in the top right of the following picture for clarification. This way, you won't see your hems as the quilt goes together.)
3 of the 4 rows, each with five squares, are shown here
If you need to, trim the edges so that everything is straight for you to pin the long strips of flannel to the edges of the rows. Again, right sides together and then sew allowing for a half inch seam.


ah- lovely borders
After creating all of these lovely borders, but before you attach the back to the quilt, wash the quilt. I know it isn't dirty, and I know you pre shrunk all fabric... Washing and drying it now (even in a light, gentle cycle without soap and the low heat dryer setting) will allow for the flower edges to fray ever so wonderfully. The reason I did this now and not after I attached the quilt back was in case something frayed too much and I needed to do some fixing. This way I could get to the area without having to first remove the back. Don't worry though, nothing needed fixing. Like I said, just in case...
Notice the shaggy edges?
Spread your quilt out on the floor with the backing fabric laid on top, RIGHT SIDES TOGETHER. Pin the perimeter and sew all edges together. I chose to pin one side, sew, pin another side, sew... Just remember to leave about ten inches open so you can turn your quilt right side out.
RIGHT SIDES TOGETHER

Pinning the perimeter

Ok, now turn your quilt right side out through the opening that you left on one of the edges. Hand stitch the opening shut. And, ta-da! Smile.


Monday, January 30, 2012

Family recipes now online!

In an effort to help me figure out what to cook each day, and hoping to make finding my recipes easier, I have moved all our family recipes to an online source. They are organized into a variety of categories so that I can search for them based on what ingredients I have on hand, what occasion I need to be cooking for, how much time I want to spend preparing dinner, if I'm using the croc pot or the cast iron skillet, who in my family originally made the food... You get the picture.

Some of our favorites include fish tacos, green chili pork, sloppy jos, and apple pie. 

Click on the Tons of Recipes tab above to check it out!

Saturday, January 28, 2012

Q and A about the pleated wrap skirt

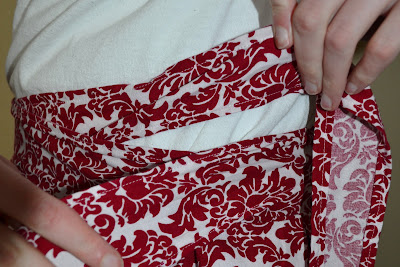
I got asked a question today about the pleated wrap skirt tutorial that I have posted. (Go ahead and click here to see what skirt I am talking about.) Someone was wondering how exactly it ties and whether or not there was a button hole to thread one of the ties through. That was a great question; it is actually one that I had when I first started to make the skirt. Alas, I did not use a button hole and I promise it all ties up very nicely. The ties just cross one over the other. I took some pictures just now to try and show this.
Notice on the left of the picture how the ties over lap?
Just keep the band flat against your waist as you wrap it around you, this way it won't get bulky when it crosses over.
This shows the waist band overlapping itself. If I had finished the bow, the cross over would have been hidden.

Tuesday, January 24, 2012

Versatile Blogger Award

Pam at Threading My Way totally made my day last week when she passed on the Versatile Blogger Award to me! Thank you Pam, I'm honored.
And, now it is time for me to pass it on. Here is how it all seems to work:

There are rules for accepting the Versatile Blogger Award:
  1. Thank the award-giver and link back to them in your post.
  2. Share 7 things about yourself.
  3. Pass this award along to 15 recently discovered blogs you enjoy reading.
  4. Contact your chosen bloggers to let them know about the award.
OK... 7 things about me:
  1. I am a massage therapist.
  2. I knew my husband when I was a little kid.
  3. I used to con my grandma into sewing me clothes by telling her that this time I really did want to learn.
  4. My favorite food might be cole slaw.
  5. Swimming laps is my favorite form of exercise.
  6. I spent a summer in East Africa and would love to go back there someday.
  7. I went through a phase in pre adolescence where I would only speak pig Latin.
And now... 6 blogs I enjoy reading, in no particular order:
(I know, I know, the rules say 15 but 6 is just going to have to do- I have a ten month old after all and she does not like sharing me with this blog.)

1. Better With Age Jamie posts pictures of before and after projects she does around her house. And, she has made her home beautiful!
2. NatSprat is actually one of the first blogs I ever followed. Nat has really cute tutorials and blogs in a way that makes you feel as if you know her.
3. Welcome to the Good Life I started following Sarah because of her fashionable sewing skills, but I fell in love with this blog when her husband hacked her account to leave a very sweet Birthday message to her. Such love there!
4. The Sassy Pepper. I always love a blog with good tutorials, Sassy and Pepper also have a super cute etsy shop.
5. Lots of Pink Here Amy says she sews to keep herself sane! She has a patchwork sewing kit tutorial that I'd like to try out.
6. Dumped and Discovered is a fantastic blog about finding beauty in discarded items. I love the end results and I might just get brave enough to up-cycle some furniture around here!

Head on over to these fabulous blogs and say, Hello. I think you will find good ideas and inspiration from each of them.

*If I've passed the award on to you and you'd prefer not to pass it on, no worries.

Saturday, January 21, 2012

Link Party Headband

I have really been enjoying Threading My Ways link parties. Pam posts a new, themed link party every week, and they remain open. This makes them a perfectly organized source for continual inspiration. Link parties that have already taken place are Bags, Girls Dresses, and Womens Dresses. This week is Hair Accessories. Here is what I have to contribute:
Flower head band with lace and brown feathers. 

Everything was attached either with fabric glue or hot glue, is there a better way?

By the way, if you haven't done so yet, make sure to view my previous post (below after returning to my home page) and enter to win my lace tote giveaway!

Wednesday, January 18, 2012

Lace Tote Giveaway

I think I first fell in love with lace when I was just a kid and my mom told me that lace was tacky. There was something about that forbidden fabric that I couldn't resist. The first lace item I owned was a pink lace baseball cap that I HAD to have when I was four and have never forgotten. Lucky for me, lace is in these days and it's classy. I made a navy blue tote this week with a cream colored lace overlay. Perhaps my favorite part is the lace flower applique. This tote can easily be dressed up for a night out, or paired with jeans for cute casual. It's large enough to hold a school book or two, or a wallet and makeup pouch, or even diapers and on- the- go toys. As much as I love this project, I'm willing to give this versatile bag to you! How? Two ways. The first is to head on over to where The Sassy Pepper (click here to enter) has been gracious enough to host this fabulous giveaway. There, she will explain how you can enter to win this giveaway not once, but two times! While you're there be sure to check out The Sassy Pepper's blog for awesome tutorials and other decorating inspiration. The second way to make this bag yours is to check out my brand spankin' new Etsy shop. The benefit to buying one of these totes is that YOU can pick the color of tote and the color of lace that YOU want. I hope you like it as much as I do!


Here is the front.

Here is the back.
Lace flower applique.

 *Giveaway Now Closed.

Sunday, January 15, 2012

Ten months old


This cutie pie was ten months old last week! Her favorite thing is to have people mimic her. She makes silly sounds or faces and gets a kick out of mom and dad copying her. Peek a Boo and I'm Gonna Get You games get good laughs from all of us. She is very observant which is why she flushes the toilet when she wanders into our bathroom and knows how to get in and out of both her coat and her car seat. I sure do appreciate her help in the kitchen as she can peel oranges and load the dishwasher full of toys. Her favorite food by far is cheese; oranges and yogurt come in second and third. We absolutely love her spunky attitude. Despite having her pacifier in her mouth the other day, she was whining and fussing. My husband started whistling loud enough to drown her out and to distract her. Well, she gave him the dirtiest of looks and promptly shoved her pacifier into his mouth in a "be quiet dad" manner! She has taken a few independent steps, but is currently of the opinion that crawling is the best method of movement; it's certainly a fast one! Most days, she will take a bottle which is good because she definitely gets more to eat that way rather than by breast feeding. And, we are finally getting lots of sleep at night. Perhaps this has something to do with the bottle feedings filling her up. Typically she sleeps nine hours before needing to be fed, and then she sleeps three more.


Here is a video of her cracking up over Peek a Boo.

Thursday, January 12, 2012

1930s vintage inspired dress

I have developed a major crush on the 1930's house dress and set out to make my own version. I don't have a pattern, but I do have a sort of similar style of dress hanging in my closet. I wish I could say this project was as simple as laying that dress down on left over wrapping paper, cutting around it, and sewing it back together. That is, after all, how I started out. I had to do a LOT of improvising. Here are some pictures of my inspiration:


15 cent pattern! Can you imagine?
And now, here is my dress:


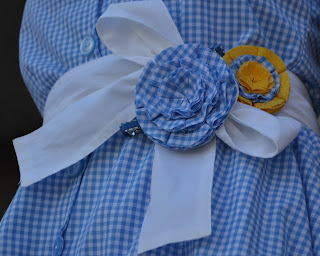
Such a lovely house dress! Too bad my grungy house sweatpants are so cozy. Oh, and by the way, I didn't intentionally purchased Dorothy from the Wizard of Oz blue and white fabric, but I should note that the Wizard of Oz story did take place in the 1930s and that the movie was released in 1939. Perfect!

Sunday, January 8, 2012

Great- Great Grandfather

My great grandpa on my fathers side arrived in Florida to live closer to family through the winter, just before we had to fly home. I am so glad that we were able to see him, and that our daughter was able to meet her great- great grandpa. Some things are just precious. Grandpa was so funny. He hadn't seen me in a while and when I told him I was so happy to see him, he responded very cheerfully, "You are? Well good! I have no idea who you are!" That's ok. There were lots of pictures taken and we told him that a lot of his family was here and wanted their picture with him. He insisted that he was not responsible for all of these people!

My dad with his grandpa

There are ninety years between these beautiful hands

Five Generations!
My child, Myself and my brother, my dad,
my dad's uncle, and great- great grandpa