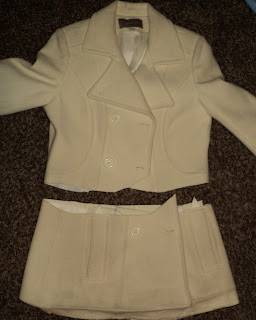
I don't suppose there is ever one right way to do anything, but here is what I did:
By the way, you will need:
A pea coat
Sewing machine
Matching lace (I used 3 yards)
Needle and thread for minimal hand stitching
Start with a pea coat and cut it apart. Hem the inside lining.
Then, fold the new edge of the coat under and zig zag stitch. I chose to do this because it preserved more length then folding twice like I do for hemming. It also looks nice on the outside and will hopefully keep the wool from fraying.
Next, I cut the bottom part of the coat into pieces. I wanted to use as much of the coat as I could so that I could get the most ruffles out of the material. This was difficult because of seams, buttons, and pockets, but I sewed even the littlest pieces together into strips. I came up with two strips, each 7 feet long. One was 2 1/2 inches wide and one was 3 inches wide.
Ok, so determine which edge of the strips you want to be the top and which you want to be the bottom. I hemmed the bottom and the two side edges of both strips. To the top, I folded under once and zig zag stitched just like I did for the coat.
I took the wider of the two strips (remember that one of mine was 3 inches wide and one was 2 1/2 inches wide) and cut a stip of lace the same length. Pin to the top edge and onto the right side of the wool strip. Sew in place. I wanted more lace in the back, so I added a second layer under the first. Make sure to center this!
What I did next was stupid. I stitched thru the top of each strip with very large stitches, you know so I could form my ruffles. This did not work. I think the combination of all those seams from sewing my strips together and also the thick wool kept it from bunching. So, save yourself the hastle and don't do that! Instead, pin the top of the narrower strip (the one that doesn't have lace on it) onto the coat. Right sides together. In order to form the ruffle look, I folded the strip here and there. I had to do this anyway since the seven foot strip was longer than my coat was around. Don't stress that your folds may be different sizes or at uneven distances from each other. Ruffles are beautifully imperfect! Stitch and remove pins.
Do the same thing to attach the strip with lace to the strip already attached to the coat. Except this time, you want the wrong side of the top strip pinned to the right side of the lacey strip.
I had a little extra lace and two spare buttons, so I hand stitched them onto the back.
That's it! What do you think? I'm pretty pleased with it.
Monday, September 26, 2011
One blogger to another
Alright, so it has been suggested to me that I consider making tutorials for a few things I make. I'm flattered, but I feel like most of what I make looks really, well- home made. At least this way, you can take what I have done and perfect it for yourself! Happy crafting.
Pea Coat Refashion
EEEEEE!!!!!!!!!!! I am so excited. I fell in love with this coat from anthropologie, but I was not about to fork out 148$ to have it. Instead, I pulled out my pea coat from the back of my closet that must be... gosh, four or five years old now... and started cutting. And while I was cutting, I started to day dream about lace. Emmm lace. And, here is what I came up with!
Allow me to introduce Myold new coat. If you want to make one for yourself, I just finished posting a tutorial, check it out here.
Before:
And, After:
Allow me to introduce My
Before:
And, After:
Family picture time!
Nothing motivates me to get family pictures taken like a deal, or two... paired with a coupon, from shutterfly! So on the evening of the day that the deals were to end, we had some good friends take our pictures at a beautiful nature park. I'm not going to share our two favorite because those are going on our Christmas cards! But, I thought I'd share a couple others. Oh, and by the way I only spent 13 dollars; I saved $53.
Monday, September 19, 2011
Red headband with white rose
Thirty minutes before we needed to leave for church I decided that my little girl just had to have a headband!This was my first attempt so I know that it isn't the best, (but I now know how to make it better next time), and I think she made it look good!
Saturday, September 17, 2011
Time to give thanks.
I love to sit still in quiet reflection while the baby sleeps, my husband is away at work, and the sun sets behind the neighboring apartment buildings. The sky gives up her blue, and shines instead in soft pinks and purples. Fall is on her way over; a cool breeze dances in through the open windows. I feel surprised that summer is already over. We survived it! And, not only that we were so enlightened. In the midst of incredible sorrow and stress, I found equal amounts of joy and peace. Words cannot express my gratitude to all of those who took care of my family this past June. For traveling great distances to be with us, for supplying us with meals, babysitting, for making lovely arrangements, and for packing us up and moving us with only an hours notice only to help us move again a month later. I appreciate those dear friends who helped us clean, who mourned with us and encouraged us, who shared their time and talents with us in a beautiful funeral service.
I know that we do not need to be sad daily. In fact, my heart is filled with happiness! I am happy that my mom is spending her time with friends, learning and growing in wisdom and understanding. I am happy that someday, I will speak with her once more. I am happy that I realize this and that I know with every fiber of my being that we all have a heavenly Father who loves each and every one of us. I am happy because I don't understand all things, but I don't need to! He has a plan, and I trust Him. Because of the atonement, I can turn my plethora of emotions (confusion, hurt, regret, worry...) over to the Lord and I can go about my days happily, just trying to be the best that I can be. I hope I am able to be a blessing in the lives of those around me, as so many people have blessed my life.
And what a beautiful life we lead. My husband is loving school. I am so grateful to him for studying so hard and with so much enthusiasm. We are so blessed because he is able to attend such a good school, with professors who truly want to be there and want to see each student succeed! I appreciate my husband working so hard to support us so that I am able to fulfill my role as a woman by staying home to take care of our home and our daughter (believe me- this is a full time job.) I love our life. I love this city, with the friends we have made and the ones we have yet to meet. I love that we can see the temple from our home, and that our church building is less than a ten minute walk away. More than that, I love that our Heavenly Father is ALWAYS only a prayer away and that my dad is ALWAYS only a phone call away. I love that I am married to my best friend, who is such a good example to me and who leads our family with the best of intentions. This truly is a wonderful life.
Here are some pictures of our six month old that I took today. She melts my heart!
Friday, September 16, 2011
Babies don't keep
The cleaning and scrubbing will wait
'till tomorrow, fore children grow up,
as I've learned to my sorrow.
So quiet down, cobwebs.
Dust go to sleep. I'm rocking
my baby and babies don't keep.
-Ruth Hulbert Hamilton
I painted these wood letters that I already had on hand. Printed the last verse of the poem, "Babies Don't Keep," onto vellum paper and used modge podge to get the phrases onto the letters. I also decorated the letters with some buttons I had in my craft drawer. Then, I cut up an old tee shirt and sewed the rough edges together. I needed something to attach it all to... so I took apart our clothes drying rack. Then, I folded over the top of each strip and sewed so that a loop was formed. I threaded the piece from the drying rack thru each loop and hot glued the other end of the fabric strips to each letter (F A M I L Y). Finally, I tied black ribbon around the white pole and into bows that sit lovely on the two nails my husband hammered into the wall for me.
Thursday, September 15, 2011
TV stand cover
Now that our little girl is crawling, her curious fingers make big messes! I found a cute fabric that cost less than three dollars a yard and goes well in our living room, so I bought it, hemmed the edges and secured velcro to the back. I am hoping that the movies will be out of sight and therefore out of mind! Here are a couple before and after pictures. Isn't she cute when she's caught being destructive?
Saturday, September 10, 2011
Six months old!
Happy Half Birthday little one!
It is amazing that after only six months we can't remember the good times we must have had without her! We kinda had a rough start... combination of colicky baby and clueless mother... but things are great now. We're all caught up on our sleep! She smiles and giggles, rolls and crawls, sits up and cuddles. Sweet potatoes make her gag (literally). Carrots go down a little easier. Her favorite toy is the plastic multi- colored key set and ring. Her eye brows are so expressive! She loves swimming ie crawling through the kiddie pool and trying to grab and hold onto the water spraying out at the splash park.
FYI: I made that baby quilt |
More of these super cute baby reflection photos here |
coconut shrimp with summer BBQ suace
Had a lot of fun making a tasty recipe for dinner tonight! I thought I would share this super easy, fairly healthy coconut shrimp recipe that I have, of course, altered to make gluten free (but you'd never know it- it's that good).
Ingredients:
1/2 pound of cooked, de-veined shrimp (tail on)
1/2 cup of coconut
1/2 cup of crushed rice chex cereal
3 egg whites
1/2 cup of flour (gluten free for me)
1 tablespoon melted butter
Directions:
Preheat oven to 350 and spray a baking sheet with non stick spray. Spread the coconut evenly around the pan and bake for about 5 minutes or until it begins to brown and your kitchen starts to smell amazing.
Put the flour in a small bowl.
Put the egg whites in another small bowl and whisk briefly. (If I had had any, I would have added a drop or two of coconut extract to the egg whites.)
Combine the rice chex and 3/4 of the toasted coconut in yet another bowl. (Set the remaining coconut aside.)
Dip the shrimp first in the flour, then in the egg whites, and then in the cereal/ coconut. Place on the cookie sheet. Bake about ten minutes, until the shrimp is warm. If you did use raw shrimp then bake until it is cooked through. When you remove them from the oven, drizzle on the melted butter and the remaining coconut.
These are good on their own, but I made a summer BBQ sauce to dip them in:
Summer BBQ Sauce Recipe:
In a blender, mix the following:
1 cup BBQ sauce (homemade or store bought)
1 cup pineapple chunks
1 tablespoon vinegar
1/3 cup of peach jam
1 fresh garlic clove, minced
A few shakes of chipotle seasoning (I like Mrs. Dash)
A few shakes of minced onion spice
Enjoy!
Throw pillows
My husband's grandmother gave us pillow cases that she embroidered. They are beautiful! I love them and want to keep them forever. For that reason, they have bounced back and forth from the linen closet where they stay safely folded, to the bed where I freak out whenever my husband actually uses them. So, today I turned them into throw pillows... decorative throw pillows. Now they can be displayed; admired and not used. This was really simple. All I did was cut up an old pillow, robbed it of it's stuffing and sewed some new edges. They look great in our bedroom!
Subscribe to:
Posts (Atom)